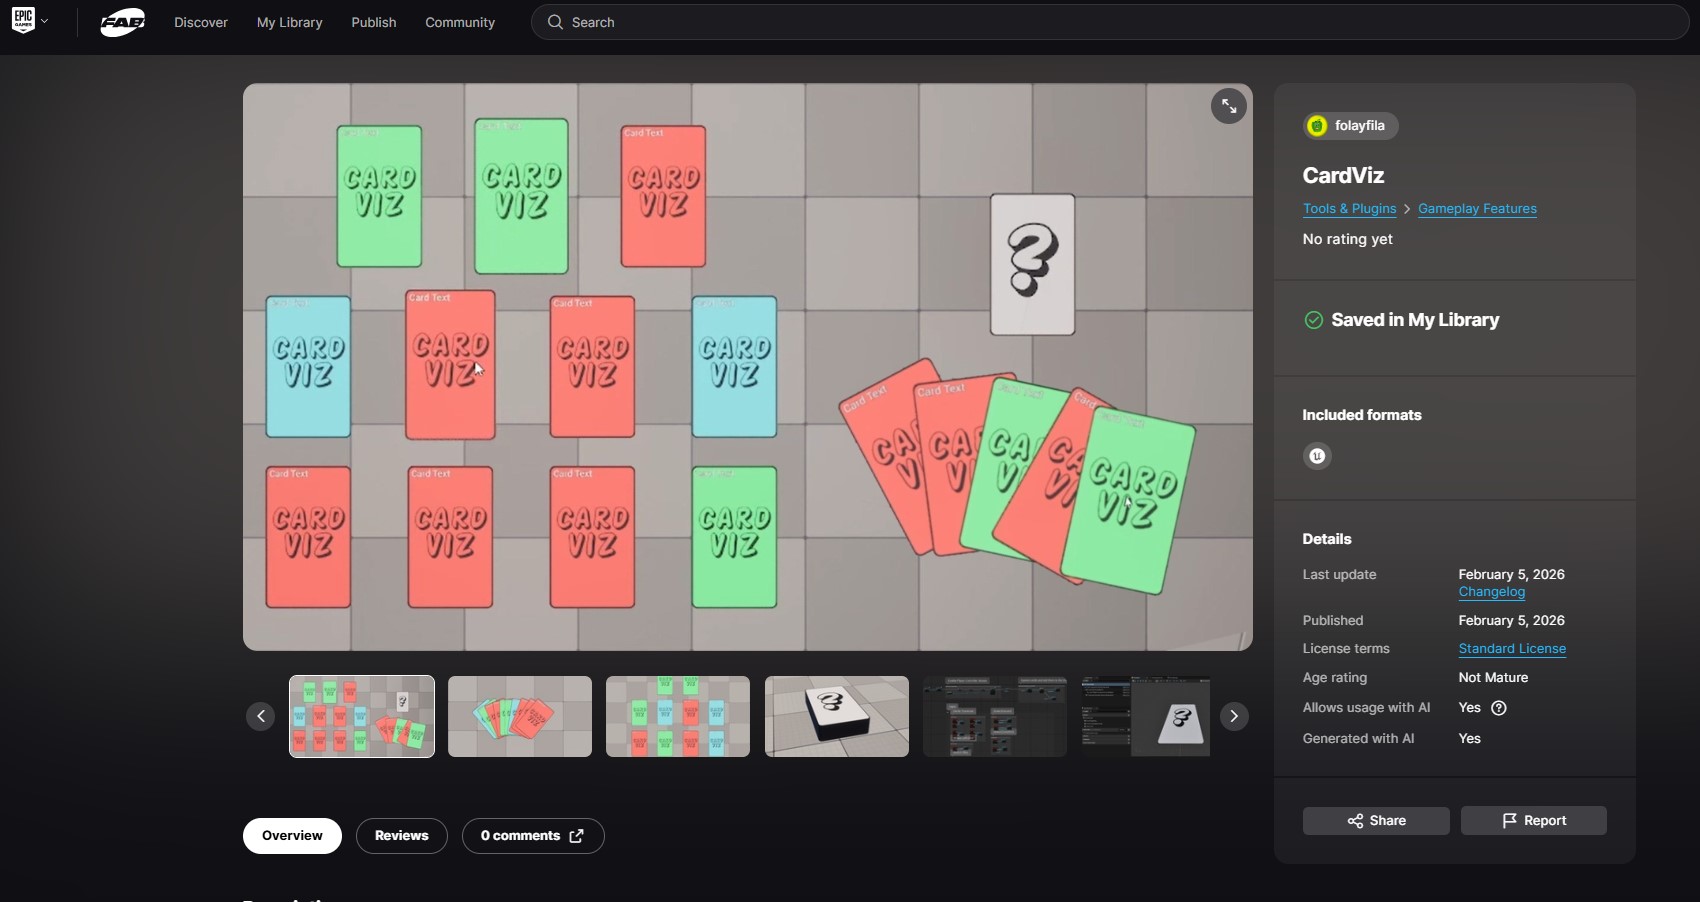
CardViz
CardViz is a modular Unreal Engine 5.7 plugin for visualizing and interacting with cards organized into piles.
What does it provide?
The plugin provides a fully functional cards and piles system out of the box. The system can be easily extended for any game-specific functionality, however, it does provide the essentials of what makes a cards game system.
Fully Playable Showcase Level With a Level Blueprint
Clear Documented & Heavily Commented Code
How Does It Work?
The following section will explain the plugin's code. While the plugin works out of the box, understanding how it works is important to use and extend it.
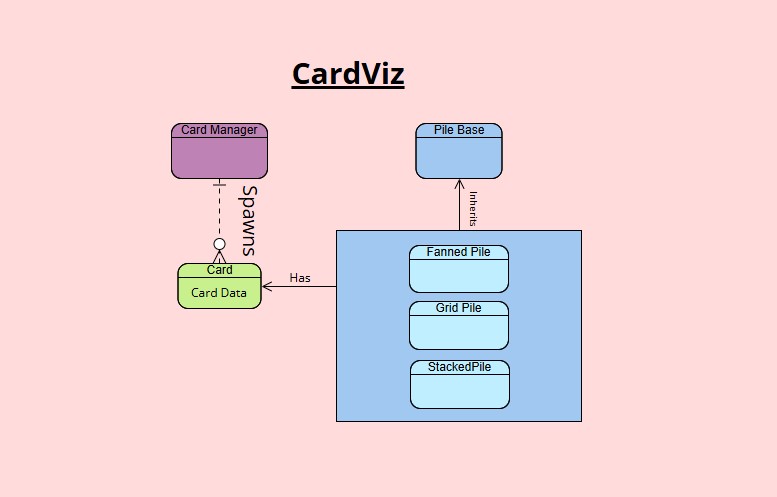
At a base level, the plugin revolves around the following classes:
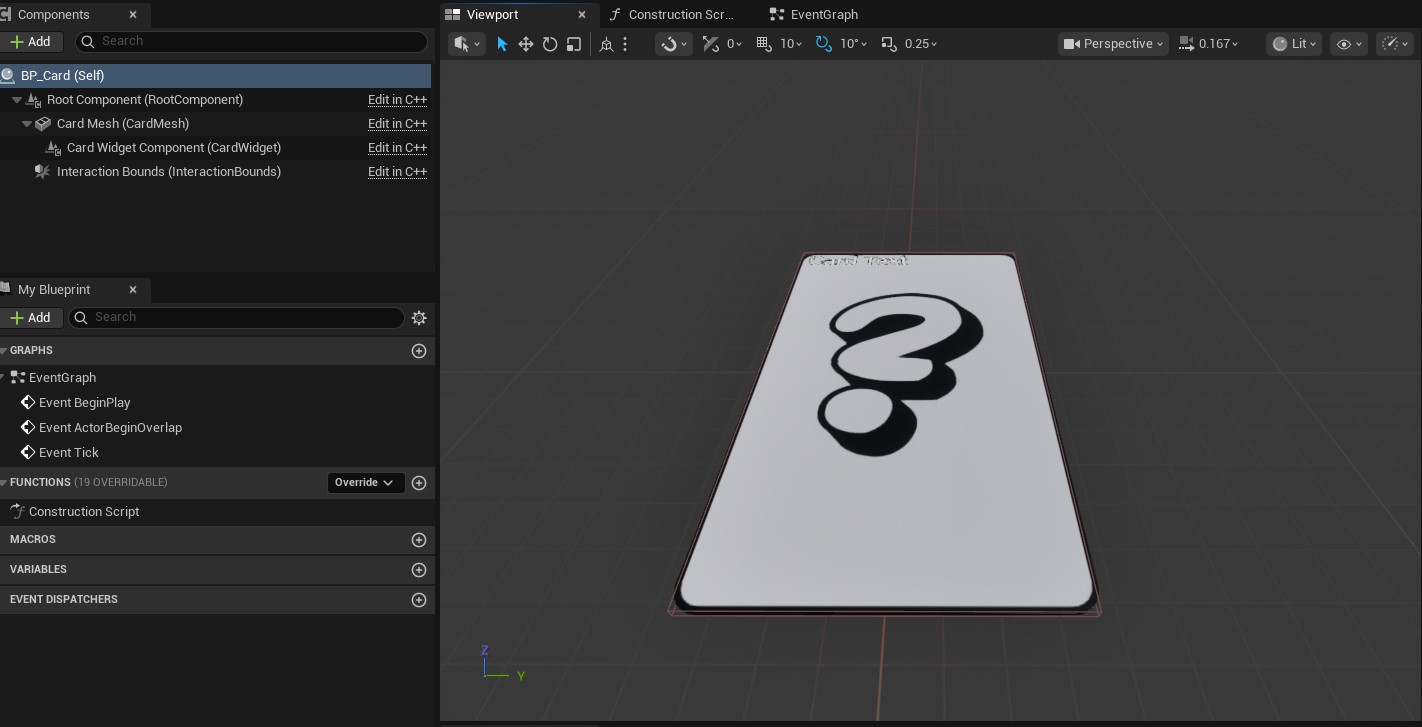
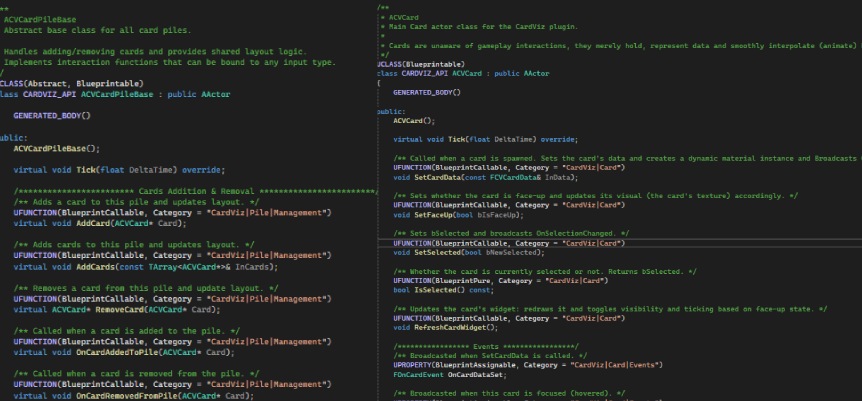
ACVCard
Main Card actor class for the CardViz plugin.
Cards are unaware of gameplay interactions, they merely hold, represent data and smoothly interpolate (animate) between transforms.
Card
// Transform wrapper
struct FCVCardAnimationTransform : public FTableRowBase
{
    FTransform Transform = FTransform(FQuat::Identity, FVector(0.0f), FVector(1.0f));
};

class ACVCard : public AActor
{
    // Main Functions:
    void SetCardData(const FCVCardData& InData);
    void SetFaceUp(bool bIsFaceUp);
    void SetSelected(bool bNewSelected);
    bool IsSelected() const;
    void RefreshCardWidget();

    public:
    // Card Data Property
    FCVCardData CardData;

    //...
    // Components and other properties...
};
Card's Data
The member CardData is of a custom struct FCVCardData. The struct holds the essential data of what makes a card.
Card Data
struct FCVCardData : public FTableRowBase
{
    GENERATED_BODY()

    public:
    /** Whether the card is currently face-up. Used to dynamically update the textures of the cards materials. */
    UPROPERTY(BlueprintReadOnly, Category = "CardViz|Card Data")
    bool bIsFaceUp = false;

    /** Gameplay tags associated with this card. (Add your custom tags from the project settings.) */
    UPROPERTY(EditAnywhere, BlueprintReadOnly, Category = "CardViz|Card Data")
    FGameplayTagContainer Tags;

    /** Texture when the card is faced up (bIsFaceUp = true). */
    UPROPERTY(EditAnywhere, BlueprintReadOnly, Category = "CardViz|Card Data")
    TObjectPtr
        FrontTexture;

     /** Texture when the card is faced down (bIsFaceUp = false). */
     UPROPERTY(EditAnywhere, BlueprintReadOnly, Category = "CardViz|Card Data")
     TObjectPtr BackTexture;
};
Card's Animation
Cards hold multiple transform members that are used to smoothly animated/interpolated (with lerp) the card whenever a change that calls for that occurs, e.g. when the user draws a card from a pile.
This is achieved by having cached transforms that the card should return to once an action is over, and one
main TargetTransform that all gets set from the piles.
On tick, the card interpolates from its current relative transform to the target transform.
The beauty of this system is that it allows for complete animation freedom, such that each pile can dictate the intended card animation on certain actions.
Card Animation Header
    /***************** Card Animation *****************/

    /** Transform the card should return to when idle in a pile; set when added to a pile. */
    UPROPERTY(BlueprintReadWrite, Category = "CardViz|Card|Animation")
    FCVCardAnimationTransform IdleTransform;

    /** Transform the card should use while selected in a pile; set when the card is selected. */
    UPROPERTY(BlueprintReadWrite, Category = "CardViz|Card|Animation")
    FCVCardAnimationTransform SelectedTransform;

    /** Current target transform the card will interpolate toward; updated for each animation. */
    UPROPERTY(BlueprintReadWrite, Category = "CardViz|Card|Animation")
    FCVCardAnimationTransform TargetTransform;
    /*********************************************/
Card Animation Update
void ACVCard::Tick(float DeltaTime)
{
    Super::Tick(DeltaTime);
    // Smoothly interpolate current position to target.
    FVector CurrentLocation = RootComponent->GetRelativeLocation();
    if (TargetTransform.GetLocation() != CurrentLocation)
    {
        FVector NewPos = FMath::VInterpTo(CurrentLocation, TargetTransform.GetLocation(), DeltaTime, LerpSpeed);
        SetActorRelativeLocation(NewPos);
    }

    // Smoothly interpolate current rotation to target.
    FRotator CurrentRotation = RootComponent->GetRelativeRotation();
    if (TargetTransform.GetRotation() != CurrentRotation)
    {
        FRotator NewRot = FMath::RInterpTo(CurrentRotation, TargetTransform.GetRotation(), DeltaTime, LerpSpeed);
        SetActorRelativeRotation(NewRot);
    }

    // Smoothly interpolate current scale to target.
    FVector CurrentScale = RootComponent->GetRelativeScale3D();
    if (TargetTransform.GetScale() != CurrentScale)
    {
        FVector NewScale = FMath::VInterpTo(CurrentScale, TargetTransform.GetScale(), DeltaTime, LerpSpeed);
        SetActorRelativeScale3D(NewScale);
    }
}
Card's Widget Component
Cards have an optional Widget Component that can be used to display per card data. This can be used for things like rarity, damage or card costs. It opens room for developers to create cards with the same texture but different data.
Cards are unaware of gameplay interactions, they merely hold, represent data and smoothly interpolate (animate) between transforms.
Card Widget Component
void ACVCard::BeginPlay()
{
    Super::BeginPlay();

    if (CardWidgetComponent)
    {
        // Enable manual redraw to improve performance:
        // The widget will only update when explicitly requested, avoiding unnecessary per-frame render target updates.
        CardWidgetComponent->SetManuallyRedraw(true);
        CardWidgetComponent->SetRedrawTime(0.f);
        RefreshCardWidget();
    }
}

void ACVCard::RefreshCardWidget()
{
    if (CardWidgetComponent->GetWidget())
        {
        CardWidgetComponent->RequestRedraw();
        CardWidgetComponent->SetComponentTickEnabled(CardData.bIsFaceUp);
        CardWidgetComponent->SetVisibility(CardData.bIsFaceUp);
    }
}
ACVCardManager
Spawns cards dynamically from a DataTable.
Only handles card creation and initialization. Does NOT manage piles, layout, or gameplay logic.
The header file below best explains the properties and functions of this class. It can spawn a selected number of cards from a data table of FCVCardData. It can also spawn specific cards using the data table's rows' names.
Card Manager
class ACVCardManager : public AActor
{
    GENERATED_BODY()

    // Main Functions:

    /** Spawns a single card using the specified row from the DataTable at the given location and rotation. */
    UFUNCTION(BlueprintCallable, Category = "CardViz|Card Manager")
    ACVCard* SpawnCard(FName RowName, FVector Location = FVector::ZeroVector, FRotator Rotation = FRotator::ZeroRotator);

    /** Spawns cards using the CardDataTable up to TotalNumberOfCards at the given location and rotation. */
    UFUNCTION(BlueprintCallable, Category = "CardViz|Card Manager")
    TArray
    SpawnCards(FVector StartLocation = FVector::ZeroVector, FRotator Rotation = FRotator::ZeroRotator);

    /** Destroys all cards spawned by this manager and clears the array. */
    UFUNCTION(BlueprintCallable, Category = "CardViz|Card Manager")
    void DestroyAllCards();

protected:
    /** All cards spawned by the card manager.*/
    UPROPERTY(VisibleDefaultsOnly, BlueprintReadOnly, Category = "CardViz|Card Manager")
    TArray
        SpawnedCards;

        /** Total number of cards to spawn. Uses all DataTable rows if set to -1. */
        UPROPERTY(EditAnywhere, Category = "CardViz|Card Manager")
        int32 TotalNumberOfCards = 50;

        /** Whether spawned cards should be enabled and visible immediately. */
        UPROPERTY(EditAnywhere, Category = "CardViz|Card Manager")
        bool bEnableCardsOnSpawn = false;

        /** DataTable containing the definitions for each card. */
        UPROPERTY(EditAnywhere, Category = "CardViz|Card Manager")
        UDataTable* CardDataTable;

        /** Class of the card actor to spawn. */
        UPROPERTY(EditAnywhere, Category = "CardViz|Card Manager")
        TSubclassOf CardClass;
};
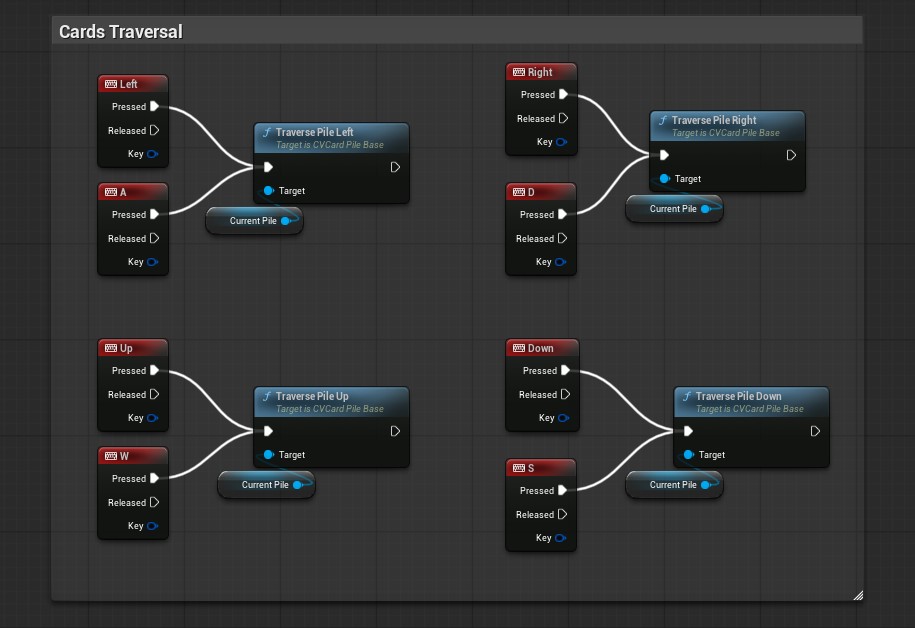
Piles
Piles are responsible for moving, using and interacting with the cards.
ACVCardPileBase
base class for all card piles.
Handles adding/removing cards and provides shared layout logic. This is by far the biggest class in the plugin as it lays out the base for other kinds of piles.
| Cards Management including addition & removal between piles (Draw/Discard). | Cards focus/unfocus & selection/deselection. | Platform-agnostic functions that can be used to interact with cards. | Virtual functions that update each card's layout in the pile. |
One of the most important functions in the pile base and one that must be overridden
by subclasses is UpdateCardLayout.
This function, which is called from UpdateLayout,
is responsible for updating each card's transform in the pile. It gets called whenever
an action that requires updating the card's transform is invoked, e.g. card selection or drawing.
ACVCardPileBase::UpdateLayout
class CARDVIZ_API ACVCardPileBase : public AActor
{
    //....
    protected:
    /**
    * Updates the layout of a card within the pile.
    *
    * Called whenever the pile's card array changes.
    * Subclasses should override this to implement custom layout behavior.
    *
    * @param Card The card to update.
    * @param CardIndex The card's index in the pile.
    */
    UFUNCTION(BlueprintNativeEvent, Category = "CardViz|Pile|Layout")
    void UpdateCardLayout(ACVCard* Card, const int32 CardIndex);
    virtual void UpdateCardLayout_Implementation(ACVCard* Card, const int32 CardIndex);

    private:
    /** Called whenever a change in Cards occurs. Refreshes the layout of the cards in the pile. */
    void UpdateLayout();
    //....
};

// cpp
void ACVCardPileBase::UpdateLayout()
{
	const int32 NumCards = Cards.Num();
	if (NumCards == 0)
	{
		return;
	}

	for (int32 Index = 0; Index < NumCards; ++Index)
	{
		ACVCard* Card = Cards[Index];
		if (!Card)
		{
			continue;
		}

		UpdateCardLayout(Card, Index);
	}
}
The base class is filled with comments that explain every function, most of them are to use immediately, but some of them are meant to be overridden. The following section will showcase the different piles in the plugin, which will provide a better understanding of the class' structure.
ACVCardPileStacked
Represents a pile where cards are stacked on top of each other.
This is perhaps the simplest one of the bunch, as it's just cards stacked on one another, no fancy layout whatsoever. So we will start with this one and ease into the other piles later.
For starters, a pile subclass should override a handful of base functions. They are mostly the cards layout and movement functions.
Stacked Pile Overrides
class CARDVIZ_API ACVCardPileStacked : public ACVCardPileBase
{
    GENERATED_BODY()

    public:
    virtual void AddCard(ACVCard* Card) override;

    virtual void OnCardAddedToPile(ACVCard* Card) override;
    virtual void OnCardRemovedFromPile(ACVCard* Card) override;

    virtual void FocusCard(ACVCard* Card) override;
    virtual void UnfocusCard(ACVCard* Card) override;
    virtual void SelectCard(ACVCard* Card) override;
    virtual void DeselectCard(ACVCard* Card) override;

    /**
    * Focus traversal functions for stacked pile.
    * All directions (Right, Left, Up, Down) focus the top card since cards are stacked.
    */
    virtual void TraversePileRight() override;
    virtual void TraversePileLeft() override;
    virtual void TraversePileUp() override;
    virtual void TraversePileDown() override;

    protected:
    virtual void UpdateCardLayout_Implementation(ACVCard* Card, const int CardIndex) override;

    // Properties...
}
Each pile implements its custom behavior, things like how a card should behave when hovered (focused), or when it's selected, and how cards are placed in the pile.
For the stacked pile, in order to achieve the stacked look, we simply offset each card slightly above the previous one.
ACVCardPileStacked::UpdateCardLayout_Implementation
void ACVCardPileStacked::UpdateCardLayout_Implementation(ACVCard* Card, const int32 CardIndex)
{
    const FTransform IdleTransform(FQuat::Identity, FVector(0.0f, 0.0f, CardIndex * CardsZOffset), FVector(1.0f));
    Card->IdleTransform.SetTransform(IdleTransform);
    Card->TargetTransform.SetTransform(IdleTransform);
    Card->SelectedTransform.SetTransform(IdleTransform);
}
As explained previously in the pile base, UpdateCardLayout is called on each card, when an action that changes a card's layout is invoked. Overriding this one is the key to having custom layouts.
Another important part is overriding the un/focus (un/hover) functions. These can dictate how a card should behave once un/focused.
To achieve this look, we simply move the top card a certain offset. This is done by updating the TargetTransform of the card. (Refer to the card animation section for more.)
Stacked Pile Un/Focus
void ACVCardPileStacked::FocusCard(ACVCard* Card)
{
    Super::FocusCard(Card);

    if (!Card)
    {
        return;
    }

    Card->TargetTransform.SetLocation(Card->IdleTransform.GetLocation() + TopCardFocusOffset);
}

void ACVCardPileStacked::UnfocusCard(ACVCard* Card)
{
    Super::UnfocusCard(Card);

    if (!Card)
    {
        return;
    }

    Card->TargetTransform.SetLocation(Card->IdleTransform.GetLocation());
}
Overriding Add/Remove card functions can be utilized to decide whether cards should be enabled or face up, amongst other things too. In the stacked pile, we ensure all cards are face down, and only the top card is enabled, as we only really interact with that one.
Stacked Pile Add/Remove
void ACVCardPileStacked::AddCard(ACVCard* Card)
{
    Card->SetFaceUp(bIsTopCardFacedUp);
    Super::AddCard(Card);
}

void ACVCardPileStacked::OnCardAddedToPile(ACVCard* Card)
{
    Super::OnCardAddedToPile(Card);

    // Enable the top card only
    Card->SetActorEnableCollision(true);
    Card->SetActorHiddenInGame(false);

    // Disable the card below the top. All cards will be visible, but only the top is enabled.
    if (Cards.Num() > 1)
    {
        Cards[Cards.Num() - 2]->SetActorEnableCollision(false);
    }
}

void ACVCardPileStacked::OnCardRemovedFromPile(ACVCard* Card)
{
    Super::OnCardRemovedFromPile(Card);

    if (Cards.Num() > 0)
    {
        // Top card was drawn; Enable the current top card.
        Cards[Cards.Num() - 1]->SetActorEnableCollision(true);
    }
}
This covers the essentials of what makes a pile subclass, the rest of the piles follow the same rules, but with different and slightly more complex layouts.
ACVCardPileGrid
Represents cards in a grid (table-style) layout.
This layout is what you'd see in a "Heartstone" or a real life card trading scene, it is cards laid out on a grid (rows & columns).
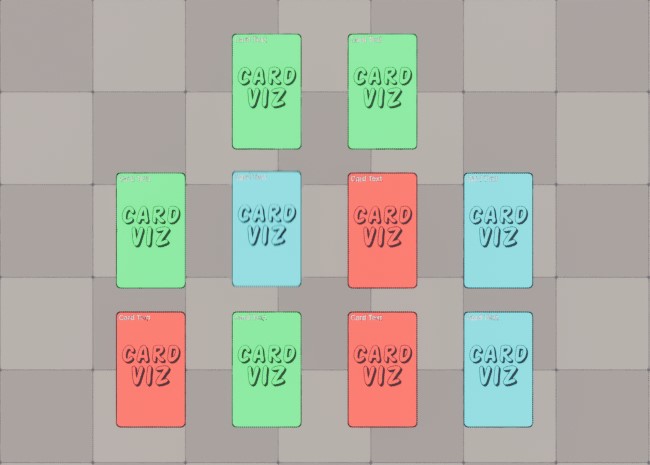
Similar to the stacked pile, the grid pile overrides the main layout update functions. Using a "MaxNumberPerRow", we list the cards next to one another with an offset. Once a row is full, we move onto another one by also calculating an offset based on the card's index.
Grid Pile Layout Update
void ACVCardPileGrid::UpdateCardLayout_Implementation(ACVCard* Card, const int32 CardIndex)
{
    // Location
    const int32 NumCards = Cards.Num();

    int32 Row = CardIndex / MaxCardsPerRow;
    int32 Col = CardIndex % MaxCardsPerRow;

    // How many cards are in THIS row.
    const int32 CardsInThisRow = FMath::Min(MaxCardsPerRow, NumCards - Row * MaxCardsPerRow);

    // Half-width of this row (for centering).
    const float HalfRowWidth = (CardsInThisRow - 1) * CardSpacing.Y * 0.5f;

    const float XOffset = Row * CardSpacing.X;
    const float YOffset = (Col * CardSpacing.Y) - HalfRowWidth;

    FVector IdleLocation(XOffset, YOffset, CardSpacing.Z);

    const FTransform IdleTransform(FQuat::Identity, IdleLocation, FVector(1.0f));
    Card->IdleTransform.SetTransform(IdleTransform);
    Card->TargetTransform.SetTransform(IdleTransform);
    Card->SelectedTransform.SetTransform(IdleTransform);
    Card->SelectedTransform.SetScale(IdleTransform.GetScale3D() * SelectedCardScale);
}
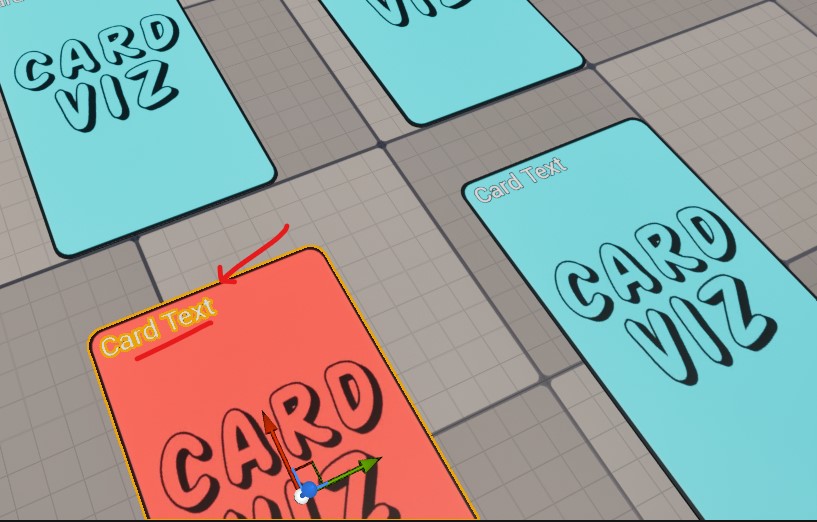
You might have noticed in the last code block that we update the card's selected transform
Card->SelectedTransform.SetScale(..)
Unlike the stacked pile, the grid pile is usually something a player would have and use, so there should be an indicator that a card is selected.
Changing the scale as shown above will result in this look:
As mentioned at the start, this plugin is input-agnostic, meaning it provides functions that can be used for all kinds of input. The example below showcases the function used for navigating through the cards in a grid pile to the right and left.
ACVCardPileGrid::TraversePileRight
void ACVCardPileGrid::TraversePileRight()
{
    const int32 CardsCount = Cards.Num();
    if (CardsCount == 0)
    {
        return;
    }

    // First card by default.
    int32 NewCardIndex = 0;

    if (CurrentFocusedCard)
    {
        const int32 CurrentFocusedIndex = Cards.Find(CurrentFocusedCard);
        NewCardIndex = FMath::Clamp(CurrentFocusedIndex + 1, CurrentFocusedIndex, CardsCount - 1);
        UnfocusCard(CurrentFocusedCard);
    }
    FocusCard(Cards[NewCardIndex]);
    }
}
This can be assigned to input actions later. As an example, it's already assigned within the level blueprints to the keyboard arrow keys.
ACVCardPileFanned
Represents a hand of cards laid out in a fan shape. Uses curve-driven positioning for smooth spacing and rotation of cards.
This layout is how you'd normally hold playing cards in real life. Cards are curved around a center.
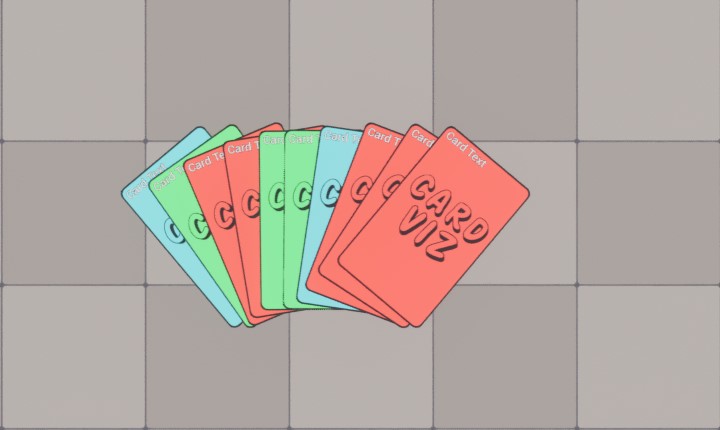
Like the rest, the fanned pile overrides the main layout update functions. It uses CurveFloats to allow freedom of customizing the arched layout.
Fanned Pile Layout Update
void ACVCardPileFanned::UpdateCardLayout_Implementation(ACVCard* Card, const int32 CardIndex)
{
    const int32 NumCards = Cards.Num();
    float HandRatio = (NumCards == 1) ? 0.5f : static_cast (CardIndex) / (NumCards - 1);

    // Location
    float HeightFactor = 0.f;
    if (HeightCurve)
    {
        HeightFactor = HeightCurve->GetFloatValue(HandRatio);
    }
    FVector IdleLocation(HeightFactor * CardsOffset.X, HandRatio * CardsOffset.Y, CardIndex * CardsOffset.Z);

    // Rotation
    float RotationFactor = 0.f;
    if (RotationCurve)
    {
        RotationFactor = RotationCurve->GetFloatValue(HandRatio);
    }
    FRotator IdleRotation(0.0f, RotationFactor * MaxFanAngle, 0.0f);

    const FTransform IdleTransform(IdleRotation.Quaternion(), IdleLocation, FVector(1.0f));
    Card->IdleTransform.SetTransform(IdleTransform);
    Card->TargetTransform.SetTransform(IdleTransform);
    Card->SelectedTransform.SetTransform(IdleTransform);
    Card->SelectedTransform.SetLocation(IdleTransform.GetLocation() + FVector(SelectedCardsXOffset, 0.0f, 0.0f));
}
We also update the selected card's transform here. We add a slight x offset to it:
Note also how when a card is focused(hovered), the cards next to it are pushed to the side, even selected cards. This is where the cards animation system shines. The cards animate towards their target transform.
For this case, we check if a card is selected to decide what the target animation should be.
ACVCardPileFanned::FocusCard
void ACVCardPileFanned::FocusCard(ACVCard* Card)
{
    Super::FocusCard(Card);

    if (!Card)
    {
        return;
    }

    int32 FocusedIndex = Cards.Find(Card);

    if (FocusedIndex == INDEX_NONE)
    {
        return;
    }

    Cards[FocusedIndex]->TargetTransform.SetRoation(FRotator::ZeroRotator);

    for (int32 MovedCardsIndex = FocusedIndex + 1; MovedCardsIndex < Cards.Num(); ++MovedCardsIndex)
    {
        if (Cards[MovedCardsIndex]->IsSelected())
        {
            Cards[MovedCardsIndex]->TargetTransform.SetLocation(Cards[MovedCardsIndex]->SelectedTransform.GetLocation() + FVector(0.0f, CardsPeekYOffset, 0.0f));
        }
        else
        {
            Cards[MovedCardsIndex]->TargetTransform.SetLocation(Cards[MovedCardsIndex]->IdleTransform.GetLocation() + FVector(0.0f, CardsPeekYOffset, 0.0f));
        }
    }
}
An important thing to note is that a pile can have many selected cards, but only ONE focused card. A selected card can be un/focused, that doesn't change its selection state.
Hover Problem
A tricky problem that I faced while working on this plugin, was hovering cards with the mouse. The case was: Player hovers a card -> card starts animating, which can move it away from the mouse -> mouse is no longer hovering the card -> cards start animating back.
Then this case would keep looping, and the card seems to be snapping in place.
Solution
To tackle this problem, I added a small timer that starts when a card is hovered. Once it elapses, we check if the mouse was moved a certain amount. If not, then the user means to keep hovering the same card, so we don't trigger the return animation.
On the other hand, if the mouse is moved past that margin or another card is being hovered, only then does the card return to its idle transform.
Hover Update
void ACVCardPileBase::UpdateMouseHover()
{
     APlayerController* PC = GetWorld()->GetFirstPlayerController();
     if (!PC || !PC->bEnableMouseOverEvents)
     {
        return;
     }

     FVector2D MousePos;
     if (!PC->GetMousePosition(MousePos.X, MousePos.Y))
     {
        return;
     }

     FHitResult Hit;
     ACVCard* HitCard = nullptr;

     if (PC->GetHitResultAtScreenPosition(MousePos, ECC_Visibility, true, Hit))
     {
        HitCard = Cast(Hit.GetActor());
        if (!Cards.Contains(HitCard))
        {
            HitCard = nullptr;
        }
    }

    // Switch to the new card immediately.
    if (HitCard && HitCard != CurrentFocusedCard)
    {
        UnfocusCard(CurrentFocusedCard);
        FocusCard(HitCard);
        HoverLostTime = 0.f;
        return;
    }

    // Still hovering same card.
    if (HitCard == CurrentFocusedCard)
    {
        HoverLostTime = 0.f;
        return;
    }

    // No card hit.
    if (CurrentFocusedCard)
    {
        TryStartGrace(MousePos);
    }
}

void ACVCardPileBase::TryStartGrace(const FVector2D& CurrentMousePos)
{
    const float Delta = GetWorld()->GetDeltaSeconds();

    // first frame losing hover
    if (HoverLostTime == 0.0f)
    {
        HoverLostMousePos = CurrentMousePos;
    }

    HoverLostTime += Delta;

    if (HoverLostTime < HoverGraceSeconds)
    {
        return;
    }

    const float DistSq = (CurrentMousePos - HoverLostMousePos).SizeSquared();

    if (DistSq >= FMath::Square(HoverMouseDeadzone))
    {
        UnfocusCard(CurrentFocusedCard);
        HoverLostTime = 0.0f;
    }
}
Example: Selecting the most left card in a fanned pile. Notice how the card doesn't animate back until we move the mouse.
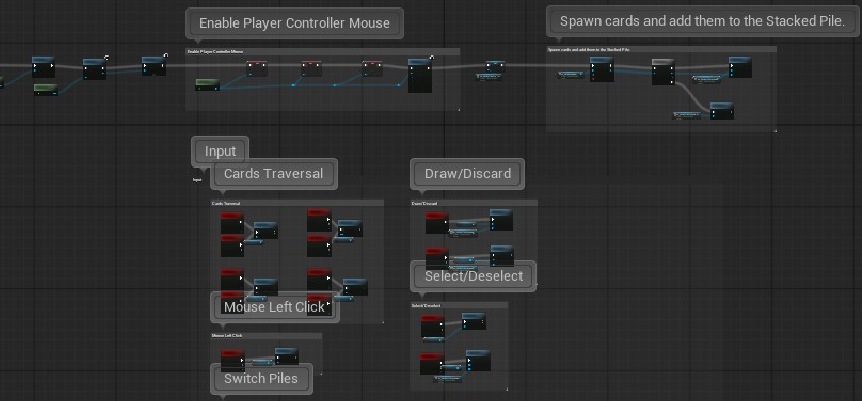
How To Use It?
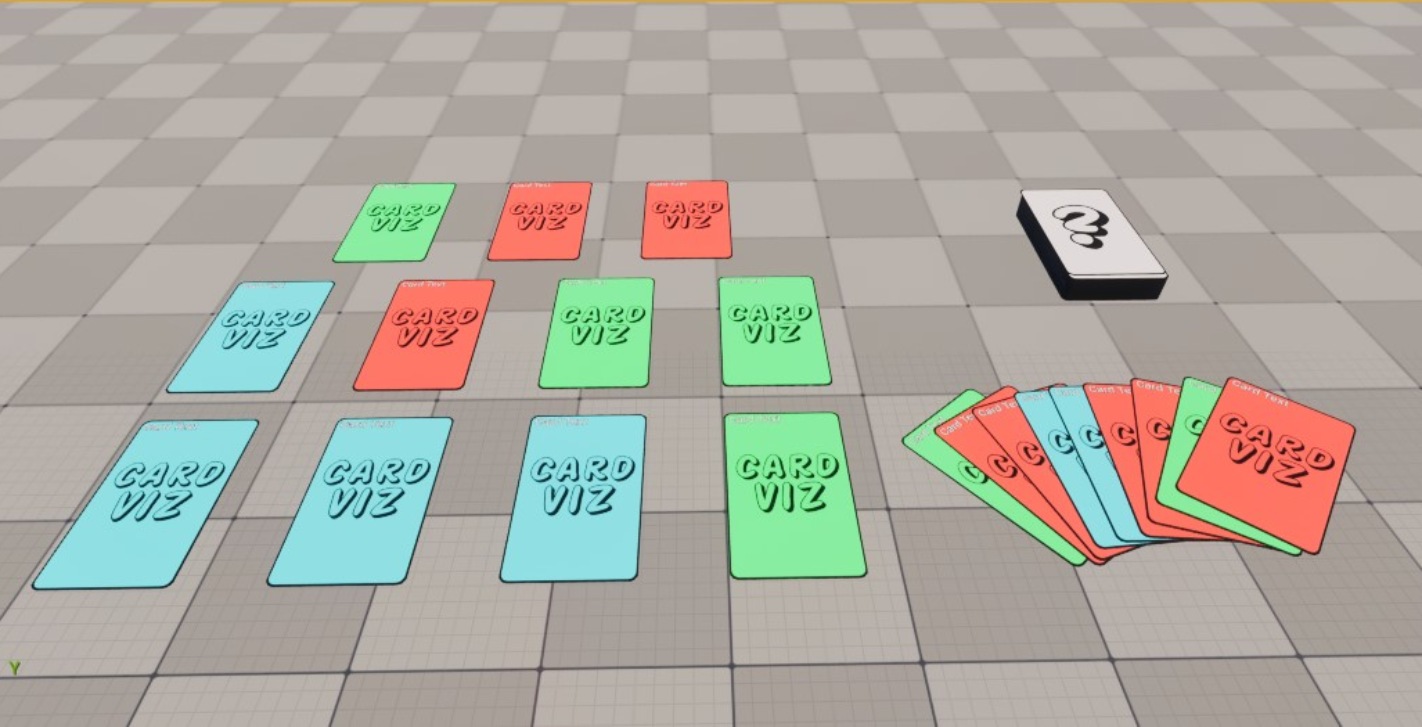
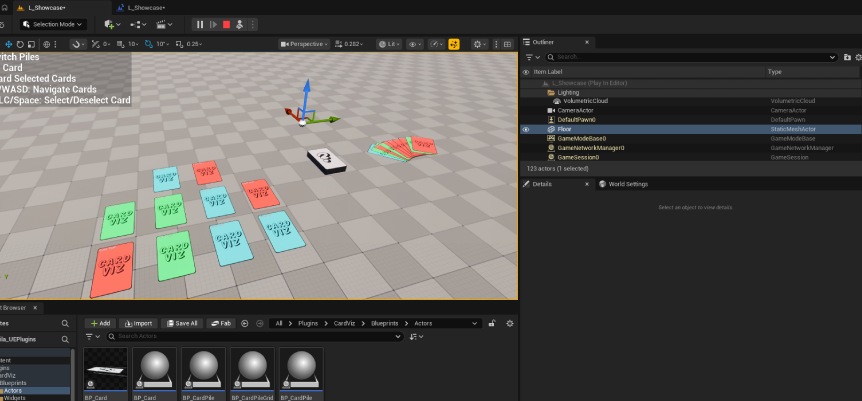
Showcase Level
The video above walks through the showcase level that comes with the plugin. As shown in the video and in the introduction, the level comes with 3 piles, and the demo allows users to switch between the piles, interact with them, draw and discard cards.
Level Blueprint
To keep things self-contained, the actor blueprints don't have any custom functionality, instead all of the blueprint code is in the level's blueprint.
This ensures that things work out of the box, despite your custom project settings.
First, OnBeginPlay we add the instructions widget, enable mouse input,
spawn a bunch of cards and add them to the stacked pile.
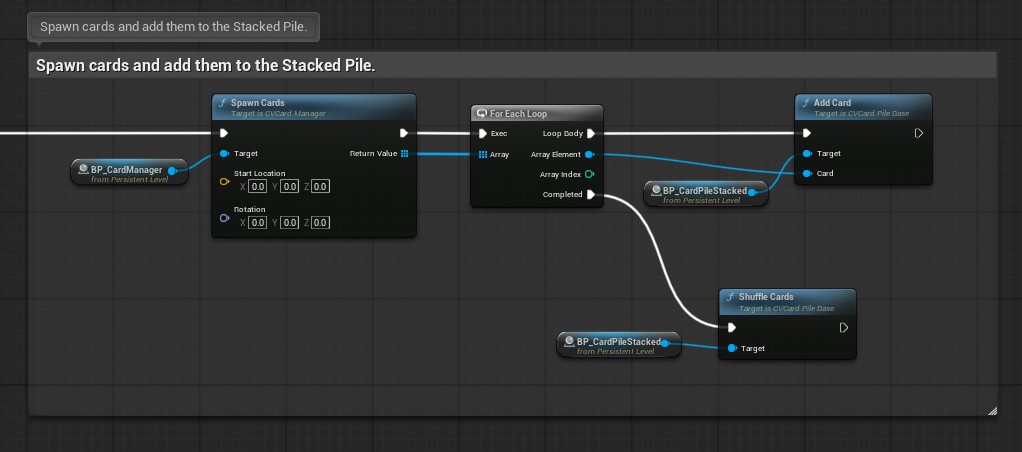
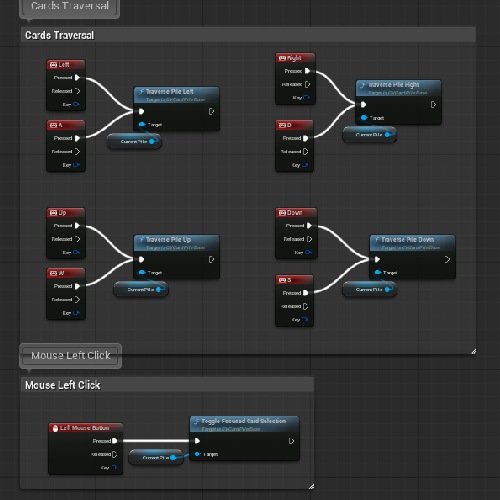
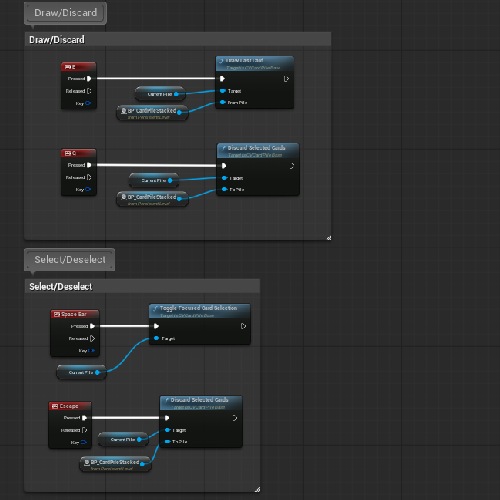
The rest of the code, is simply mapping input actions to the piles' actions.
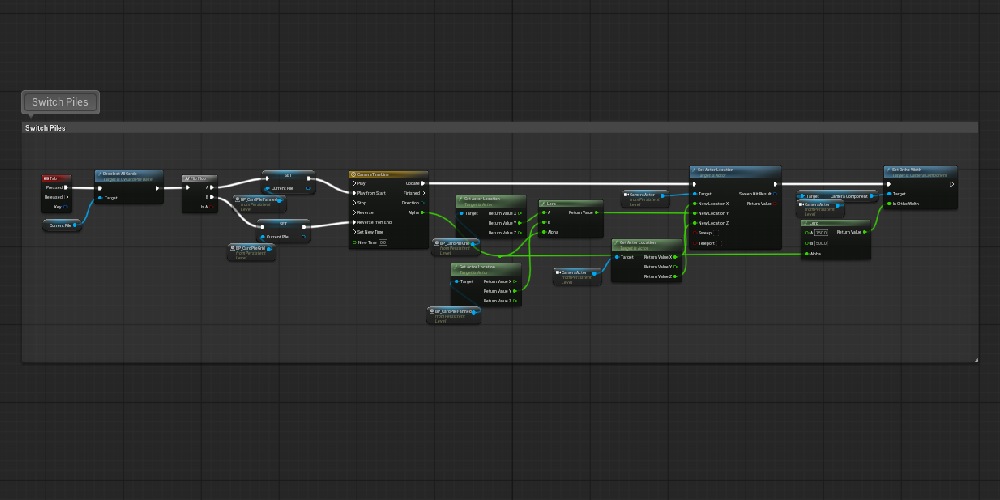
For switching between piles, a simple flip flop with a timeline is used to lerp the camera's location.
Creating Your Own Piles
This section will show a step by step on how we can use the plugin to create our own pile.
We will create a diagonal layout pile, where cards will be displayed in a diagonal line.
We will do that in blueprints, as it is generally easier to implement blueprints into C++ than the other way around.
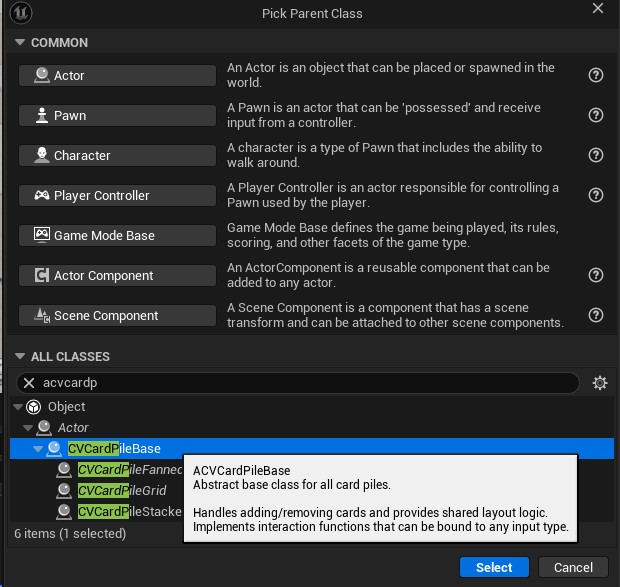
1. Create A New Blueprint
Create a new blueprint from the ACVCardPileBase
class and call it BP_CardPileDiagonal.
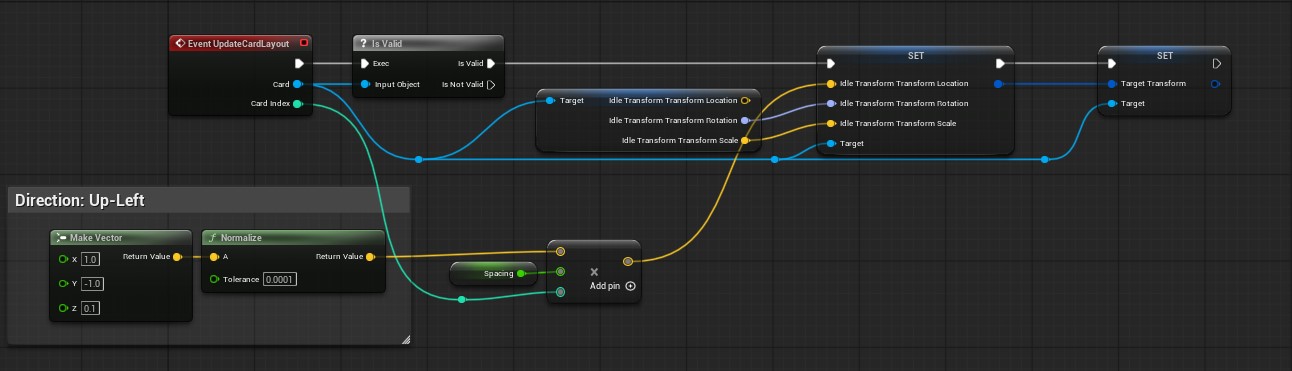
2. Override UpdateCardLayout
Open the event graph of the new blueprint, right click and add the
UpdateCardLayout event.
Tip: You can lookup any functions or properties of the plugin by right-clicking and typing "CardViz".
Next add the following code, which uses the index to offset each card by a constant vector pointing up-left.
Note: "Spacing" is a float we created with a default value of 125.
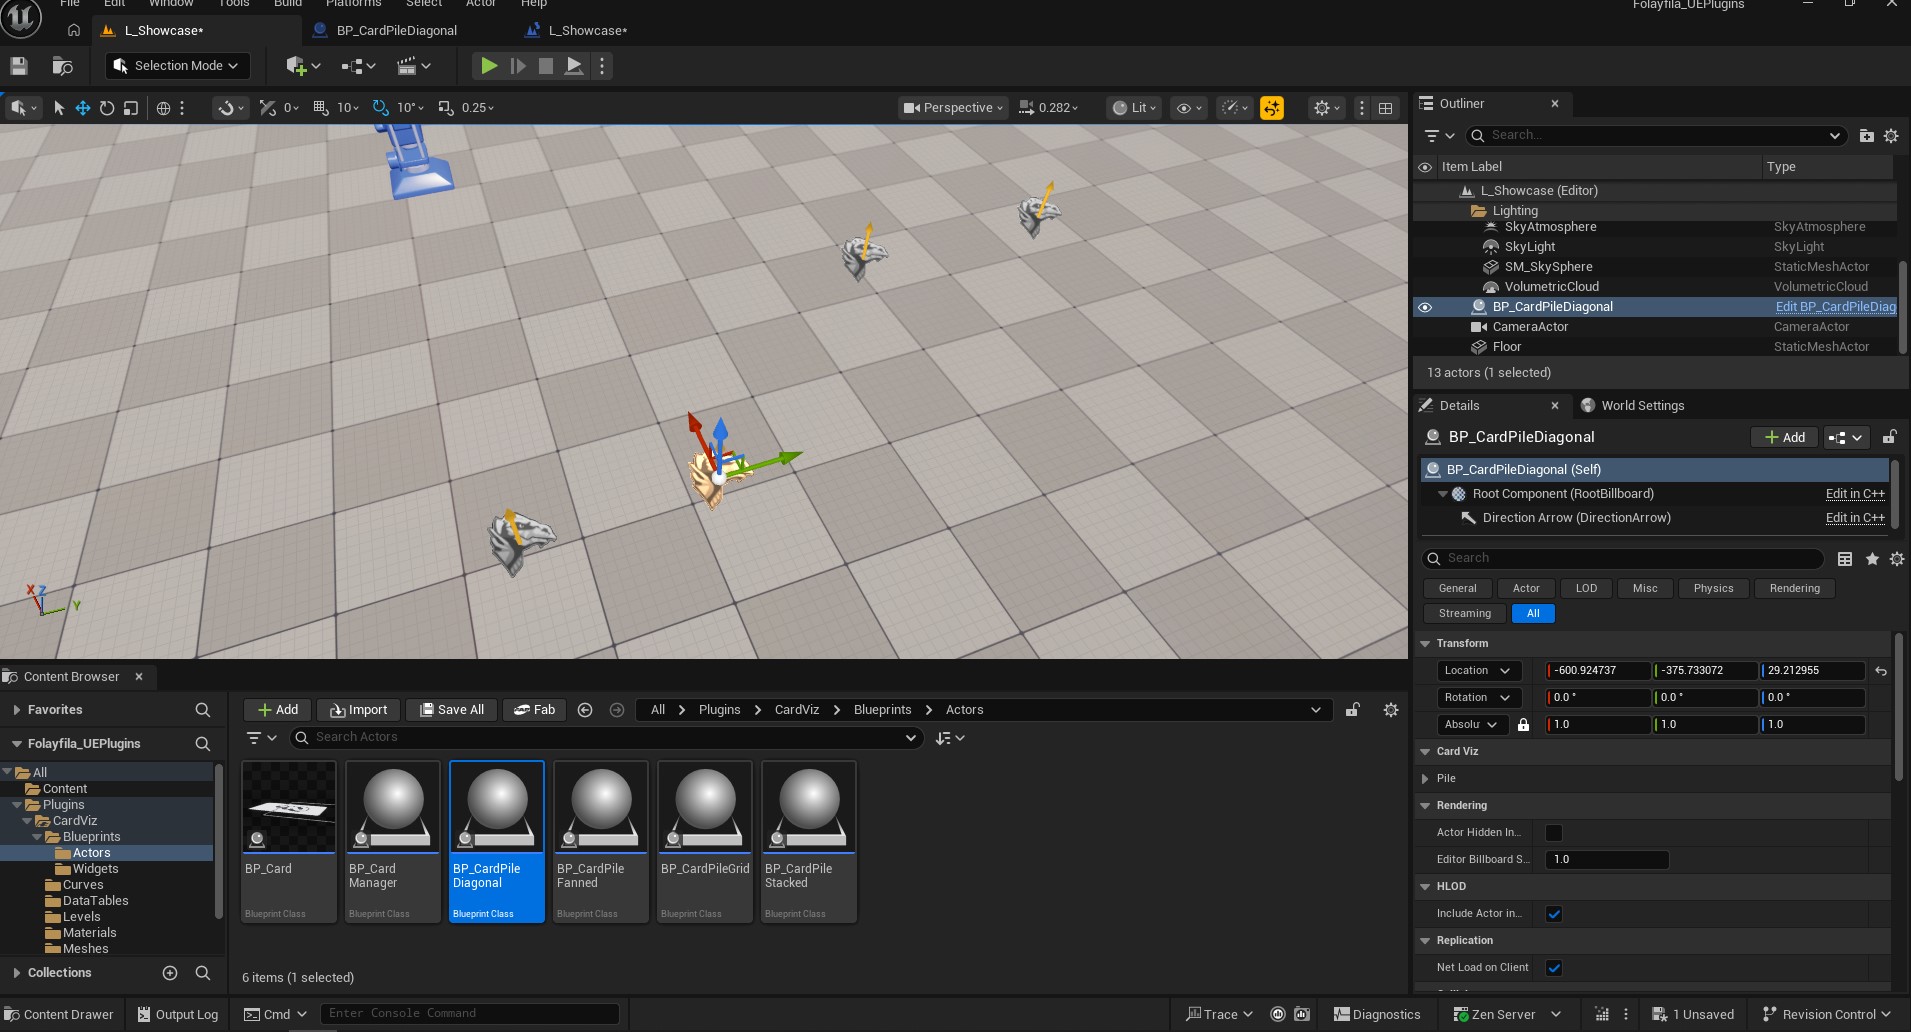
Add an instance of in the BP_CardPileDiagonal level.
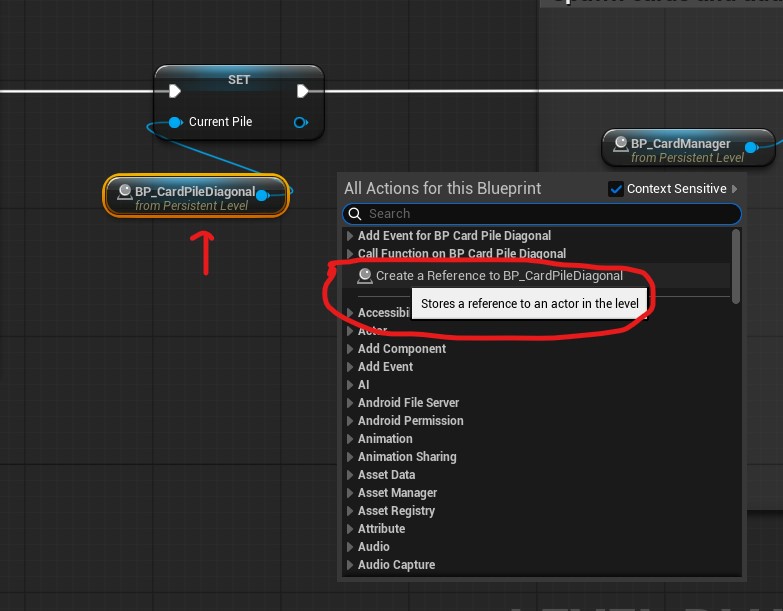
In order to test our results, we need to access the new actor in the level blueprint.
You can do that by selecting the actor and opening the level blueprint.
If you right-click in the event graph, you should find a
reference to the actor BP_CardPileDiagonal.
A. For simplicity, let's disable the current pile switching. Untick the execution line of the Tab input event (Pile Switching).
B. OnBeginPlay set the current pile to the new
BP_CardPileDiagonal actor in your level instead of the current one.
C. Compile, save and playtest. You should see something like this:
3. Un/Focus
If you tried interacting with cards of the new pile, you might notice some weird behavior. This is because we haven't configured focusing yet.
To do so, right-click in the diagonal actor's event class and look for the focus/unfocus event.
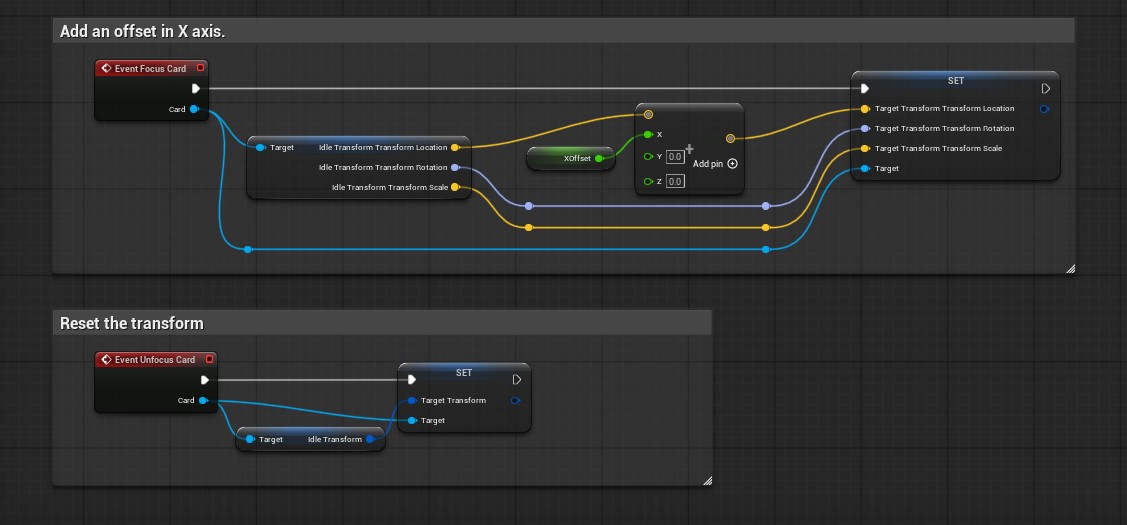
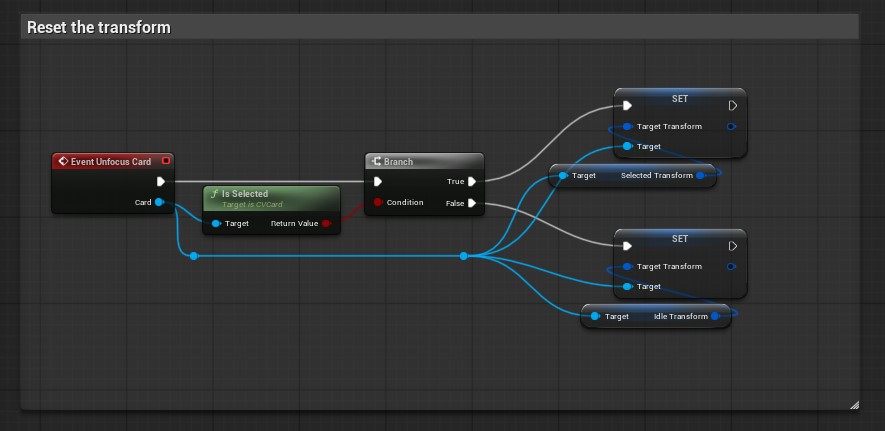
We will add a simple X offset to a hovered card, similar to the stacked pile, and reset it when it's unfocused.
Note: "XOffset" is a float added with a default value of 20.
4. On Card Added
Before we test again, we should make sure that the cards are enabled and faced up when added to our pile.
To do so, right-click in the diagonal actor's event class
and look for the OnCardAddedToPile event.
Add the following code to enable the card and set it faced up:
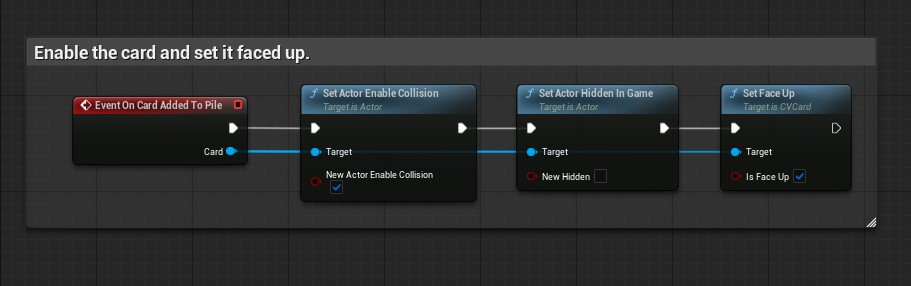
Compile and test. The cards should now be facing up and react to the focus/hover action:
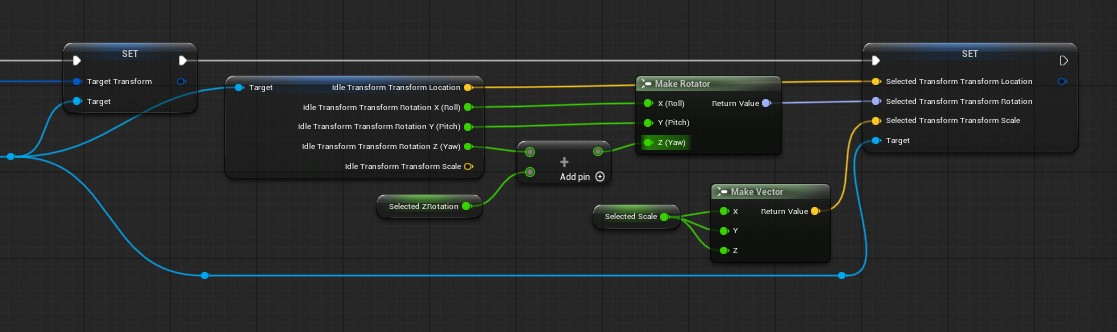
5. Card Selection
To dictate the card's behavior when selected,
we must set the SelectedTransform in UpdateCardLayout.
For this example we will scale the card and rotate it to the side.
Create two floats, SelectedScale = 1.25 and SelectedZRotation = 30.
Add the following code:
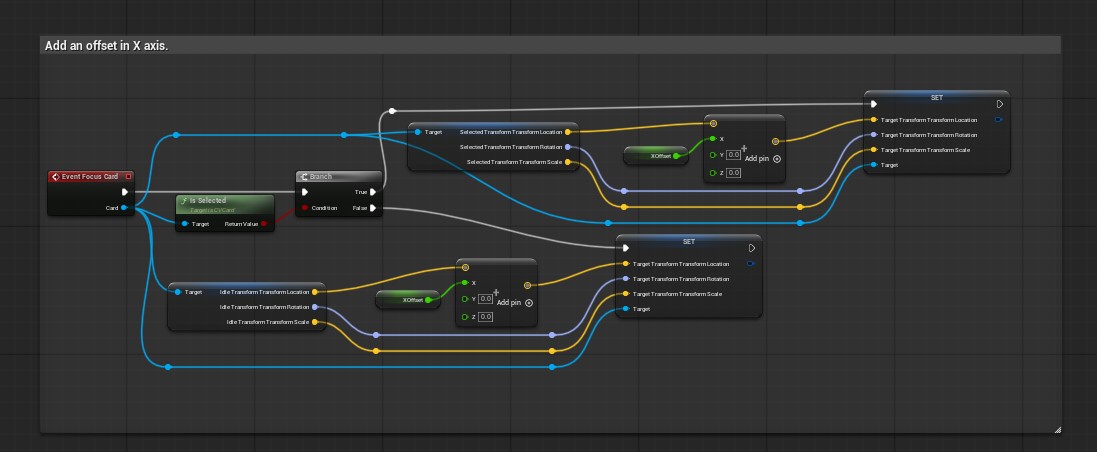
Next we must update the focus/unfocus code to account for the selection transform. This can be done by adding the focus offset to the selected transform if a card is selected, otherwise we add it to the idle transform.
Tip: if you're working with blueprints only, consider creating wrapper functions for the transforms, to avoid blueprint wire mess.
Compile and test. The cards should now be react currectly to mouse hover and selection:
6. Buttons Support
Lastly, we need to implement the traversal/navigation functions so that we can navigate through the cards with buttons.
To do so, look for the Traversal events. We will add a simple up and down implementation that suits our diagonal pile.
This can be achieved by simply focusing on the next card in the pile, or the previous of the currently focused card.
Add the following code:
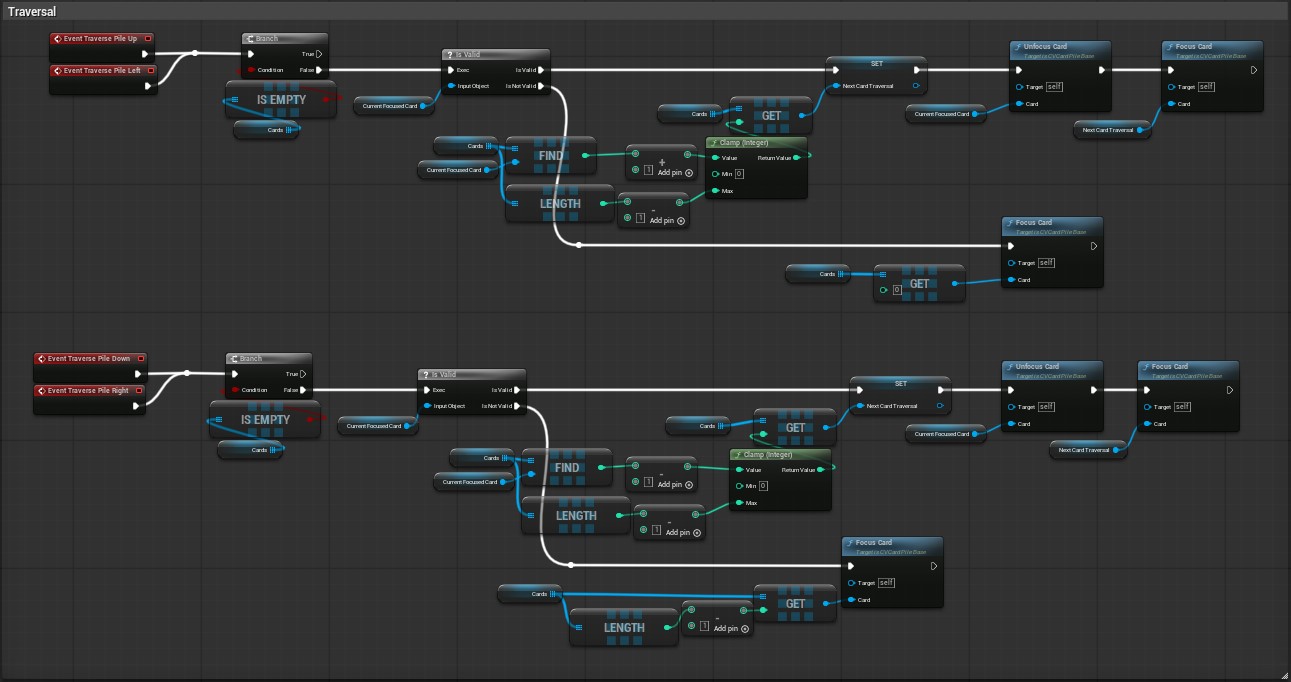
Note: Up and left share the same implementation. Same goes with down and right.
Note: NextCardTraversal is a variable we're saving before unfocusing the current card. This is what is usually a local variable in a function.
Compile and test with the keyboard buttons. With this we should have a fully functional diagonal pile.
Hope this helped :)
Get The Plugin For Free!